
Are you looking forward to using your new baseball glove?
But, Is its stiffness preventing you from performing at your best?
Do you want your glove to be more supple so that its catching area is to your liking to improve your performance?
Don’t worry, there is an easy solution: flare it.
Flaring a glove means shaping its pocket and making its leather more forgiving.
A flat, shallow pocket is formed by flaring out the ends of the thumb, and little finger ends.
You should know how to apply the solution to your glove now that you have it.
In this article, I will explain how to flare your baseball glove.
What Is The Point Of Flaring A Baseball Glove?
Before diving into the methods for flaring a glove, you need to have a general notion of why you should do so.
As stated in the introduction, flaring forms a flat pocket in the glove, enhancing the catching area while also allowing for faster transfers.
If done properly, flaring your baseball glove will ensure comfort while wearing it and move smoothly according to your hand movements.
Ways To Flare A Baseball Glove
Following are the various ways in which you can break in your baseball glove.
1. Flaring Glove: Oven Method
Follow the steps below to flare a glove in the oven.
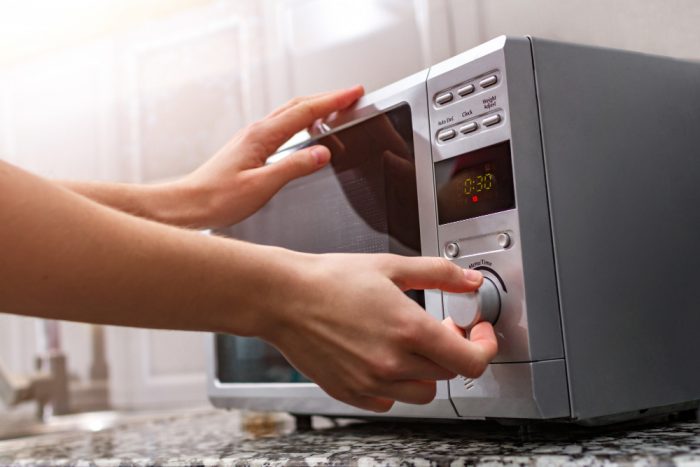
1.1 Heat Oven
Anytime you use an oven, you should preheat it, and the same is to be followed in this method.
Preheat the oven to 200 degrees Fahrenheit so that the temperature settles.
1.2 Oil The Glove
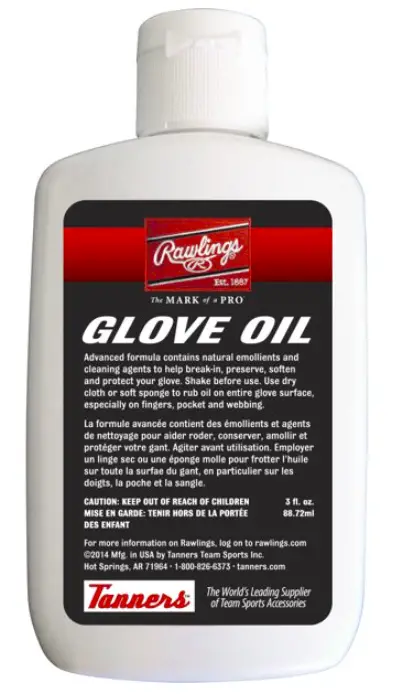
Start oiling the glove as soon as you see that the oven has been preheated to half its temperature, as oiling may take time.
Use oil recommended by the glove manufacturer, or if there is no recommendation, use good baseball glove oil and not any everyday oils such as hair oil, vegetable oil, etc. If you want something more professional, then here are some of the best oils for baseball glove.
Greasing the oil moistens it while increasing its durability and strength.
1.3 Glove Inside Oven
As soon as you finish oiling the glove, put it inside the preheated oven on an oven rack or an oven tray.
Putting the glove inside the oven makes its leather soft and flexible.
Do not put the glove inside the oven for more than 5-10 minutes at a time.
1.4 Check Glove’s Flexibility
Remember that every oven is different based on its power or the temperature it can reach. Also, every glove is different depending on the materials used in its making.
So, there is no specific time when the glove is to be put inside the oven to reach the desired flexibility.
Also, you are not baking a cake that you will put inside directly for a minimum of 30 minutes.
Put your glove on for short spans of 5-10 minutes and check at every interval whether it’s flexible enough to be adjusted or not.
Keep putting it inside the oven until you find it is fit for being shaped.
1.5 Shaping The Glove
When the glove is sufficiently flexible, pull it out (carefully!) and immediately begin shaping its fingers.
Wear it in one hand and mold it with your other hand, or ask someone for assistance, so that it fits properly in your hand.
Apply enough pressure to the glove to keep the form you’re giving it.
1.6 Shaping For Pocket
After you’ve finished shaping the glove’s fingers, you’ll need to make its pocket.
To form a pocket in the glove, place a baseball in the palm of the glove and pull all the other parts of the glove together. Then secure it with a rubber band or a shoelace.
Leave the glove in this position for a night to create the pocket.
1.7 Repeat The Steps
No, you are not done yet.
You will have to repeat 1 through 6 more than once to have the desired glove.
So, keep going, and your glove will reach that perfect flare.
2. Flaring Glove: No-Oven Method
Following are the steps to follow if you do not want to use an oven. The mechanism is the same, just a different procedure is followed.
2.1 Warm Water On the Glove
To work on the glove, you will have to make its leather softer and more adaptable.
Put warm water (not hot) on the glove or submerge it in warm water for 10-30 minutes, or until it feels soft enough to be adjusted.
The duration is longer since water does not influence your glove as much as in an oven.
Make sure that the water does not turn cold.
2.2 Fidgeting Glove’s Hardest Areas
As the glove becomes supple enough, bend its fingers in every direction.
Squeeze all the stiff areas like the palm and the web.
You can wear the glove and do the various actions you would do while playing and keep bending or breaking it wherever necessary.
2.3 Make The Glove Softer
To break it, even more, open the glove and punch or beat the glove throughout its surface with a mallet or anything heavy and convenient.
Like the catching area, the web. Keep turning and twisting your glove, and apply enough force on every side.
2.4 Shaping The Pocket
After you are satisfied with the gloves’ flexibility, begin by forming its pocket.
You can do this in the same way you did in the oven method.
2.5 Repeat
Repeat the steps to have the glove completely flared.
3. Playing Catch

You can break in your glove without doing anything and just playing catch.
This is the most fun method to flare your baseball glove as you will find more excuses to play the game as much as you want (in case you need any).
In the beginning, the glove’s stiffness may make things difficult, but as you continue playing with it, it will take your hand’s form and your catching style and loosen the leather. If you felt this article hasn’t given you much more information and you need some more methods to refer, then, check out this article of, ” How to break your baseball glove in 1 day.” I guarantee you, that you will find some great methods that will help you easily to get your gloves to conform to the shape of your hand.
Conclusion
To summarize, flaring involves softening and shaping the glove in whichever procedure you choose.
Whatever way you select, your glove will take its time to be perfectly customized to your specifications.
The ways mentioned above will help break into your glove no matter what your situation is.
According to some sources, heating the glove in an oven may degrade the leather’s quality and lessen its longevity, and other individuals may not have an oven; therefore, you have the no-oven approach.
If you don’t even want that, just play loads and get to the desired glove form you want. If this article already impressed you, and you wanna check out some more similar articles then check out this article about, “How to make a baseball glove?” Well then, until next time, folks!
