
Portable pitching mounds are essential equipment for baseball and softball players of all levels, from Little League to the Major Leagues.
A pitching mound is the raised area in the center of the diamond where the pitcher stands to deliver pitches to the batter.
A portable pitching mound allows players to practice and play games on fields that do not have a permanent mound or need a temporary solution.
There are many portable pitching mounds available to buy on Amazon. A quality mound will cost you over $300. Premium mounds are over $1,000. But some lower quality, get-the-job-done mounds can be found for under $200.
But, did you know you can build your own portable pitching mound?
You can build a customized mound according to your requirement without spending too much money. This way, you can choose to train all year since this is also perfect for indoor baseball facilities.
But, is it really possible?
If yes, then what are the steps that you need to follow?
Building a portable pitching mound is a great DIY project that can save you money and provide a fun and rewarding experience.
In this article, we will provide step-by-step instructions on how to build a portable pitching mound.
Here, we will get to know everything related to building a pitching mound at your home.
DIY Portable Pitching Mound Plans: Step-by-Step Instructions
- Cut a 4′ x 8′ sheet of plywood into two 4′ x 4′ pieces
- Cut 2″ x 4″ x 8′ pressure-treated lumber into four 4′ pieces
- Attach legs and supports to the bottom piece of plywood using wood glue and screws
- Attach the top piece of plywood and pitching rubber to the supports
- Sand and paint the pitching mound
- Add a pitching rubber holder and a handle for portability.
Can You Build Your Own Pitching Mound?
Yes!
You can build your pitching mound and let all the fun begin from where you build it in a game of baseball.
It should be noted that a pitcher’s mound is the domain of the game. The raised dirt area in the center of the infield is where the pitcher pitches from.
Why Should You Build a Portable Pitching Mound?
Permanent pitching mounds are so the thing of yesteryears now. The potential of portable pitching mounds over permanent pitching mounds is huge. You should go for building a portable pitching mound as they can be taken on and off the field.
Another reason for anyone to build a portable pitching mound is that one can build it according to any specific height or taper in mind.
You can build it to accommodate any age group and that is another perk of building your pitching mound.
Portable pitching mounds are also really low in maintenance. Unlike permanent pitching mounds that require a lot of effort to keep them working fine.
Portable pitching mounds can be used when practicing alone at home and in outdoor games as they can be moved around. Be it scorching heat or a heavy shower, nothing can stop you from having a nice time at a great game of baseball.
Obstacles in Building a Pitching Mound
Now, if you are looking for an affordable game of baseball where you do not have to invest much, you can start by building your pitching mound.
A pitching mound that is self-made and portable will surely make you the talk of the town as it has a lot many perks over permanent ones.
However, building a pitching mound can be quite a task and can be difficult, especially for first-timers.
You have to be specially prepared with all the tools at hand. The unavailability of anyone can come in the way of building a perfect pitching mound.
Then comes the clay. If you don’t find suitable clay to mount the pitch, it is an obstacle. You will have to make sure to use two different kinds of clay.
On the plateau region and the landing area of the mound, a harder kind of clay on the other hand, for the sides and the back of the mound, a regular infield mix clay.
Another obstacle when building a pitching mound is sourcing for clay. While doing that make sure to pay attention to the type of clay you are getting as bagged clay from suppliers can vary greatly.
Hence, mound mixes are the best to work with as they are heavy in clay.
The third obstacle is finding the right height and distance for accuracy. It is very important to find an exact height and distance.
However, it is only perfectly possible with the help of transit and a laser.
Moreover, not getting a proper orientation for your pitcher’s mound can be one big hurdle.
Many a time, not establishing the right moisture content within the clay mix can be quite disruptive in the process of smooth building of the pitcher’s mound.
Steps of Building a Portable Pitching Mound
A portable pitching mound comes in handy and therefore it’s easier to change positions. Also, why spend so much money on permanent ones if you can just build on your own? Here is the stepwise instruction for building a portable pitching mound:
Materials Needed
- 4′ x 8′ sheet of 3/4″ plywood
- 2″ x 4″ x 8′ pressure-treated lumber (4 pieces)
- 2″ x 6″ x 8′ pressure-treated lumber (2 pieces)
- 1″ x 2″ x 8′ pressure-treated lumber (3 pieces)
- 3/8″ x 3″ lag screws (16 pieces)
- 3/8″ x 5″ lag screws (4 pieces)
- Wood glue
- Deck screws
- Circular saw
- Jigsaw
- Power drill
- Measuring tape
- Level
Step 1: Cut the Plywood and Lumber
Using a circular saw, cut the 4′ x 8′ sheet of plywood into two 4′ x 4′ pieces. These will be the top and bottom of the pitching mound. Cut the 2″ x 4″ x 8′ pressure-treated lumber into four 4′ pieces.
These will be the legs of the pitching mound. Cut the 2″ x 6″ x 8′ pressure-treated lumber into two 4′ pieces. These will be the supports for the pitching rubber.
Step 2: Attach the Legs
Lay one of the 4′ x 4′ pieces of plywood flat on the ground. Attach two of the 4′ pieces of 2″ x 4″ lumber to each side of the plywood using wood glue and deck screws. Make sure the edges of the lumber are flush with the edges of the plywood.
These will be the front legs of the pitching mound. Attach the other two 4′ pieces of 2″ x 4″ lumber to the back of the plywood, again using wood glue and deck screws. These will be the back legs of the pitching mound.
Step 3: Attach the Supports
Attach the 2″ x 6″ supports for the pitching rubber to the front of the pitching mound using 3/8″ x 3″ lag screws. Place the supports so that they are 6″ apart and 18″ from the front of the pitching mound. Make sure they are level.
Step 4: Attach the Top
Place the other 4′ x 4′ piece of plywood on top of the pitching mound, lining up the edges with the bottom piece of plywood. Attach the top piece of plywood to the legs using 3/8″ x 5″ lag screws.
Make sure the screws are countersunk so that they do not interfere with the surface of the pitching mound.
Step 5: Cut the Pitching Rubber
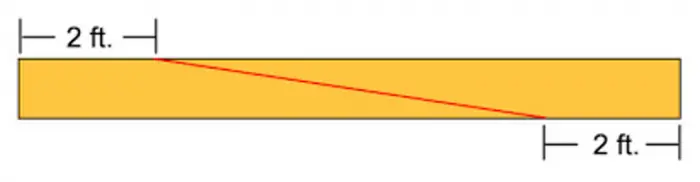
Using a jigsaw, cut the pitching rubber out of the 1″ x 2″ x 8′ pressure-treated lumber. The pitching rubber should be 6″ wide and 24″ long, with a 45-degree bevel on one end.
Attach the pitching rubber to the supports using 3/8″ x 3″ lag screws. Make sure the pitching rubber is centered and level.
Step 6: Sand and Paint
Sand the entire pitching mound to remove any rough edges or splinters. Once the sanding is complete, you can paint the pitching mound in your preferred color. Make sure to use weather-resistant paint that can withstand the elements.
Step 7: Add Finishing Touches
To add some finishing touches to your portable pitching mound, you can add a pitching rubber holder and a handle. To make a pitching rubber holder, cut a piece of 1″ x 2″ lumber to 6″ in length and attach it to the back of the pitching rubber using screws.
This will keep the pitching rubber in place when not in use. For the handle, cut a piece of 2″ x 4″ lumber to 12″ in length and attach it to the back of the pitching mound using screws. This will make it easier to move the pitching mound from one location to another.
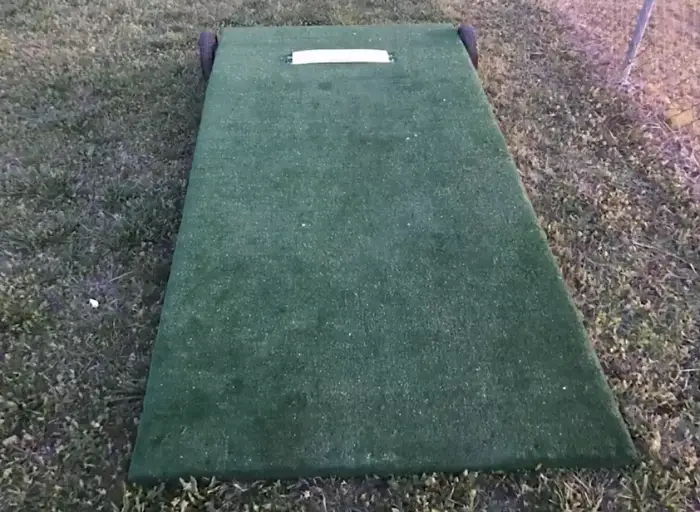
Your portable pitching mound is now complete and ready to use. With this DIY project, you have created an essential piece of equipment that will improve your pitching skills and allow you to practice and play on any field.
Remember to always use proper pitching mechanics and safety equipment when using the pitching mound. Enjoy the game!
Purchasing a New Pitching Mound vs. Building Your Own
If you are confused about whether you should invest in a new one or create your own, you need not be anymore. If you have a knack for engineering crafts, then I would suggest, you should build your own mound as the end result of playing the game will give you immense satisfaction knowing you built it from scratch.
It is much more affordable when you choose your products and assemble everything to build your very own pitching mound.
Moreover, you can build it according to your comfortable measurements and therefore you won’t have to compromise with your requirement.
However, it can be quite a hassle if you are not really that into building stuff because it requires a lot of patience to finish up what you started.
So, if you are ready to buckle up and take wood and saw in your hands, then build your very own pitching mound. You will also be a proud owner of it.

Final Thoughts

If you are a newbie in this game and are still practicing to become a good pitcher, or if your child is a budding baseball enthusiast, then you can surely go for building your own pitching mound.
However, if you are a professional player, you know what you want and maybe then you should go for a mound that you can just pay for and it serves you.
Also, if you do not have experience in carpentering, then I would say, just put in some extra bucks and get your pitching mound without any effort.
Hope this article was helpful. You can check our other baseball-related articles like NCAA Pitching Rules, How to Choose Baseball Bat for Kids, and Resistance Band Exercises For Baseball Players!